Tuesday, June 30, 2009
Moulding Plane Shelves Project - The Tool Sets
Here's the tool shot that would have normally been at the end of the moulding shelves project post:
My idea was to divide the group into smaller, task based, sets. It's a good idea, but somewhat problematic, as reality is not quite that organized. For example, should the bevel gauge be included with "layout" tools or "dovetail" tools? I chose both. Of course, the sharp eyed reader will point out that the same bevel gauge is NOT included in the full tool group photograph. Hmm. I guess it's not that FULL after all...
I'm not really trying to do anything more than the grouping, but I will include a few notes here and there. Anyway, here's my attempt at an organized tool breakdown.
Layout Tool Set:
Framing square w/ Veritas square fence*, shop-made marking gauge, 6' zigzag rule, shop-made panel gauge, pencil**, marking knife, dividers w/ pencil**, bevel gauge, 6" square.
* I like this fence, but wish it was thin on both sides, so I could use it on 3/4 stock in left and right orientation.
** Dixon Ticonderoga 1388-2/HB Soft, of course!
Dimensioning Tool Set:
Stanley #65 low angle block plane, framing square w/ Veritas square fence, cross-cut panel saw*, rip saw, shop-made marking gauge, marking knife, 6' zigzag rule, 6" square.
* Being on the shorter side, I prefer shorter saws - especially for cross cutting. This one is 20" with 12tpi.
Dado Tool Set:
Maul*, framing square w/ Veritas square fence, 6' zigzag rule, 3/4" dado plane**, Gramercy holdfasts***, batten, hammer, marking knife, story stick****.
* Like a lot of my shop-made tools, this was a quick and dirty prototype that just kept working...
** An Ohio Tool Co. 3/4" dado plane that came to me with a sketchy replacement iron, which I reshaped and hardened, and now it works great (Thanks again Dave!).
*** I am just loving these! My old system worked fine, but these are slick and a joy to use. If you are considering buying a pair, do it!
**** This should have appeared in the layout set as well. I don't know why I don't always make one of these. It was very useful, and saved me from cutting a dado on the wrong side of a line more than once.
Shaping Tool Set:
6' zigzag rule, half-round file (fine), half-round file (coarse), shop-made turning saw, Veritas spokeshave (round), Veritas spokeshave (flat), dividers w/ pencil*.
* Dixon Ticonderoga 1388-2/HB Soft. Don't ask...
Rabbet Tool Set:
Maul, sneaky framing square*, flat bladed screw driver**, Record #778 rabbet plane***, Gramercy holdfasts, 6' zigzag rule.
* NOT used for this task - don't know how it made it into that shot without me noticing.
** The set screws on the 778 are slotted - using the screwdriver is slower, but much more secure. No wandering fence or depth gauge here!
*** Or rebate plane for any Brits who might be reading this. Go Cavendish!
Surfacing Tool Set:
Stanley #7 jointer plane, Stanley #5 jack plane, Stanley #3 smooth plane, Stanley #65 low angle block plane.
Dovetail Tool Set:
Coping saw, pencil*, Lie-Nielsen dovetail saw (rip), shop-made marking gauge**, bevel gauge, Marples chisel, marking knife.
* Do I have to say it again?
** Sharpened to a knife point.
Boring and Fastening Tool Set:
Millers Falls 6" brace*, phillips hex driver bit, hex driver adapter**, no-name egg beater drill***, twist bits, hammer, bit gauge, 6' zigzag rule.
* Smaller braces are great for driving screws - much faster rotation, but still plenty of power.
** Not really needed - the brace chuck can hold the hex driver on its own, but it's so stubby it is hard to see what's going on - the adapter improves visibility greatly.
*** With the c. 1976 price from Jim Klauder & Sons Country Hardware in my Dad's handwriting - not the best drill in my kit, but my favorite.
Well, I don't think I will be doing this for every project. It's too much work for one thing, and it would probably bore most readers to tears. It was kind of interesting as an exercise in classification - at least for me - but maybe I'm just strange that way...
Sunday, June 28, 2009
More Shelves for More Moulding Planes
As I've mentioned in the past, I'm fairly addicted to moulding planes. My collection (all users, of course) has been growing steadily and it was time to make some additional shelves. At first, I was just going to make a third unit using the same design as the first two, but with a different top profile. But after looking at the space available, and visualizing the three shelving units as a whole, I decided to make this unit larger to serve as a sort of center piece, flanked by the two existing units.
Here's the plan I came up with on paper:
The smaller bottom shelf is for holding short sections of moulding profiles, as well as my plane hammer.
Here's the stock waiting for layout. The sides and bottom are full width, but the shelves are narrower to allow the back to be set into rabbets, hence the panel gauge.
The four shelves are housed in dadoes. There are a lot of ways to cut dadoes, but after trying most, I've settled on using the tool dedicated to that purpose - the wooden dado plane. For this project, I used a plane that my fried Dave sent me. It was fast and easy; thanks Dave!
Next came the shaping of the tops and the rabbets. Each side is topped with an ogee, or cyma recta, which has the upper section concave and the lower section convex. Layout was simple with a pair of dividers. I cut the curve with a turning saw and cleaned it up with spokeshaves. As this is strictly shop furniture, I didn't bother with stopped rabbets - so if you are extremely tall or very short, you'll be able to see the gaps. I can live with that.
Here's a shot of the shelves in place. All three are hanging on French cleats, which I use for hanging almost everything in the shop. If you are not familiar with these, they are two cleats, one screwed to the wall and one to the shelves (or whatever), with complimentary 45° bevels. This system uses the weight of the shelves to lock them to the wall. It's simple, strong, and very flexible. These interlocking cleats are visible in the photo below if you look very closely at the top, rear of the right-most unit.
And with the moulding planes home to roost:
This one's just a fun detail shot:
Traditionally, I end a project post with a shot of all the tools used on that project. This time I am going to do things a little differently; I'm writing a separate post with shots of the tools in task groups. I'll try to have that up in the next day or so...
Tuesday, June 23, 2009
Bench Project - Part II
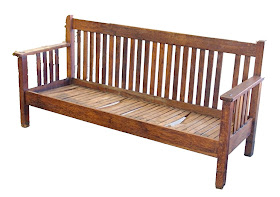
Okay, I finished the "sketch" of the new bench design. "Sketch", because I didn't actually draw it - it's more of a photo shop type deal. I started with a photograph of a bench that I liked, but it wasn't quite right. I decided to try an experiment with the computer; it was fun, and frustrating too.
First, I cut the bench out of the original picture - fairly sloppy, as I was none too sure this would even work:
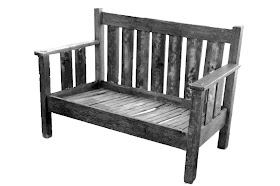
Then I did the following to get the first version of the sketch:
1. Made "repairs" to the bench - missing back slat etc...
2. Transformed to B&W - just thought it would look better this way...
3. Cut a chunk out of the middle of the bench to shorten the overall length.
4. Merged the remaining pieces back into one bench - you can still see the "scar" if you look closely, it's particularly easy to spot in the bottom slats...
5. Reconfigured the back and side slats. Basically, every two slats where joined into one wider slat - so 14 back slats became the 7 in the final design.
6. Ran a "pencil sketch" filter to make the image more sketch like; this also helped to blend the changes/additions into a more uniform whole.
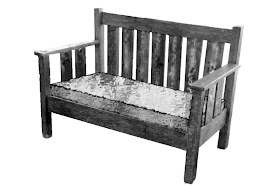
Of course the bench will need a cushion, so for the second version I did the following:
1. Created a virtual cushion for the bench.
2. Shaded the cushion for more of a 3D effect.
3. Applied a texture filter to give the cushion a more realistic surface.
4. Applied the same "pencil sketch" filter to the cushion so it would look like it belonged in same sketch as the rest of the bench - well, sort of...
Now I need to work up some measurements from the images, make adjustments as required, and get to work!
Thursday, June 18, 2009
Two Gauges
There is a rule in woodworking that is universally held to be true:
1. You can never have too many clamps.
I've apparently discovered another rule:
2. You can never have too many marking gauges.
Yes I know they are adjustable, and in theory one gauge can handle all my marking needs. And yes, if I were putting together a "Desert Island" list, I wouldn't put multiple gauges on it (well maybe one pin and one cutting...)but it seems like every time I set a gauge for the next dimension I end up needing to reset it to make one more mark. It's just a lot easier to have several gauges, each set to mark a different measurement. Besides, you can find them on the cheaper side. Thus my kit now contains a surprising number of marking gauges.
Lately, I added two more. They each needed a little work to be usable - here's the rundown.
The first gauge (or gage in the older spelling) is a Stanley #77 that I picked up on the Bay. It's a mortising gauge with a two-pin adjustable side and a single pin on the opposite side. I already had one (see rule #2 above) that I like so even though this one was a little rough and missing a small part I bought it. It's the closer gauge in the photo below.
As you can see in the photo, it was missing the brass guard inside the fence that protects the arm from the thumbscrew. It still worked that way, but the rosewood arm bears the scars of years of being crunched under the screw. The fence is stamped "Hanover Schools", so we don't have to guess how that guard went wandering off...
I didn't have any brass plate to use, but a short run out to the Blue Borg netted me some solid brass I could adapt, with plenty left over for future projects.
A hacksaw, hammer, vise, and various files made short work of crafting the new guard.
Here's the new guard and the one from my other #77 for comparison:
And a shot of the finished guard in place in the rehabbed gauge. Besides sharpening the pins with an auger file (safety edges protect the arm from being scored), all I did to the rest of the gauge was give it a light going over with mineral oil and a 3M gray pad. My goal was just to get it cleaned up and back in working order, so I didn't go for the polished brass look.
The second gauge was found in a junk bin in an Oregon store last spring. It's a bit of a mystery, as it has no maker's mark or identifying marks. It has two patent dates, one for the sliding arms and one for the brass plate on the fence (for curved surfaces) but I haven't been able to run those down on Google Patent yet. I'm pretty sure that it is a Stanley #72 - the beechwood of the #71, but of course, I could be wrong...
It has a two part arm (the arms slide on a tongue and groove joint) with independent thumb screws. Each arm has one pin.
This one just got the pin sharpening and oil treatment. Oh, and a little beeswax/oil on the T&G to help in slide smoothly.
A pleasant couple of hours in the shop and two more gauges join the stable.
Hmm. For some reason I'm reminded of a Python sketch - Mr. Arthur "Two Sheds" Jackson.
Mr. Dan "Nine Gauges" Klauder...
Monday, June 15, 2009
Josh's Saw Rehab
Okay, so the other day I am over at my brother Josh's place and there is a saw hanging on the wall. I recognize this saw. I once tried to use it when I was helping him build a deck. It was awful. Dull to the extreme. I ask him "Hey, do you actually use that thing?"
"Yeah, why?"
I take it down. I touch the teeth. I run my finger down the teeth with more than a little pressure. Egads man! You'd have better luck trying to saw a board in half with a row of dimes!
"Do you want to sharpen it?" he asks.
"Yes!"
"While you're at it, maybe you can make a nice wooden handle for it too," he suggests.
I'm thinking "No way do I have time for that!" But the seed is planted, and hey, he is my brother...
The saw:
It's a Sandvik - not much of the etch left, just part of the name, "ship point" and most of the image of a ship under sail.
When I removed the saw nuts (two were actually machine screws) I got a surprise - "Hidden Dragon!" What the? The metal plates are original, and the handle clearly has recesses made for them, but underneath are more dragon designs. Why?
I thought about changing the handle design to more of a Disston pattern, which I like better, but decided to just reproduce the existing handle. I dug up some 4/4 Alaskan birch and traced the handle. (That's not a crack in the wood, it's an old gauge line from some forgotten project...)
Using a brace and bits, I bored the holes for the saw nuts and removed most of the waste from the hand grip. I was really an idiot here, but I didn't know it yet...
Bow saw time!
I used a rip saw to cut the kerf that houses the blade in the handle. The original handle had a curved slot to fit the curved end of the blade. I just went ahead and cut a straight kerf that will show on the top edge of the handle for a few inches.
Shaping the handle was a bit of chore. One problem was finding a way to hold the work piece but still allow access for the rasps I was using. I think next time I will leave a long strip of wood attached to the handle for clamping purposes, and then cut it off when most of the handle has been shaped. For this go around, I dug up an old vise rig I used way back before I made my shavehorse. It's just a small bench vise mounted to a 2x4 that clamps into the face vise. It worked pretty well for this job.
Now back to the idiot part. When I bored the holes for the nuts, I used the wrong size auger bit. To fix this mistake I couldn't use another auger bit, as the lead screw would have nothing to hold it. So I rebored with a standard twist bit in the brace. This worked fine, but I made my second mistake and forgot to clamp a backing piece to the handle and as a result, I got some nasty tear-out. Arrgh!
Now I had to try to patch these. After crawling around on the shop floor and digging in the chips, I actually managed to sort out several of the missing chunks. For the others I cut small pieces from the cut-offs from shaping the handle. I glued these in place, clamped them up and put it aside to dry while I sharpened the saw.
I tried something new on this project. In the past, when I have sharpened saws and wanted to darken the teeth to more accurately see what is happening with the file on the teeth, I have used a magic marker. This never worked very well - it was slow, did not provide full coverage, and destroyed the marker tip. This time I used a much simpler technique that worked incredibly well. It was fast, provided full coverage and required only one special piece of equipment:
I couldn't believe I had never tried this before! So easy! It was great! Now, first I had to reshape the teeth, and for this operation I didn't need any blackening; the teeth were already very dark from age. But after shaping, when I wanted to sharpen the teeth, I really needed the blackening to help me see things. Here's a shot of the saw after reshaping the teeth, showing the difference between the unblackened shiny teeth and the blackened teeth after one pass through the candle flame.
And here's an end-on shot after sharpening one side. It is very easy to see which gullets/teeth have been sharpened and which have not. I will definitely be using this technique from now on.
Back to the handle. The patches had dried and I carefully reworked the openings with a sharp knife. Not too bad.
I decided to stain the handle dark - it just seemed like the right thing to do.
While that was drying, I made a blade guard. I ripped a kerf down a narrow piece of wood from the scrap bin. This saw has a pronounced belly to the blade - the edge with the teeth is convex. In order to keep the blade from rocking I needed the kerf in the guard to be deeper in the center. I achieved this by alternating cutting with the first couple of teeth at the toe of a saw, and scraping with the corner of a flat bladed screwdriver.
After the stain dried, I put on a coat of amber shellac...
...and then a liberal coating of my own mineral oil and beeswax mixture. The results were not too bad. I probably should have spent more time on final shaping, but I think the results are satisfactory.
I couldn't decide whether to reuse the metal plates or not. I decided to let Josh decide. I didn't have any true saw nuts, so I used some European cabinet fasteners. Not traditional, but they work. Here's the rehabbed saw without the metal plates:
And here it is with them:
Josh chose the "with" option. Here's one last comparison between the original plastic handle and the new wooden one:
A fun project. I enjoyed replacing the plastic with wood and bringing a tool back to life, and I added a new technique to my saw sharpening repertoire . Plus, it was for my brother, so it's all good!
Saturday, June 13, 2009
Bench Project - Part I
I have about three dozen projects on my list, but most of them are on the small side. As far as larger projects go, the three vying for my summer attention are: trestle table, screen door, and settle/bench. The table and the screen door don't make the cut as the current versions of these items are still functioning. However, the bench is falling apart (dowel joints) so it moves to the top of the list.
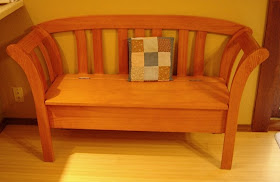
Here's a shot of the bench to be replaced:
I bought this for Celena back in the dark ages before the shop. It's not too bad really, especially considering it came from a big box store. It's real wood (except for the bottom of the storage compartment - which is some MDF/cardboard type stuff)and the design is okay. It has performed well, and I could probably reglue it and get another couple of years out of it, but I've never really loved it. So it's replacement time!
I haven't yet designed the replacement bench, but it will address the following needs:
Function: seating for at least two adults, storage space of some kind.
Form: fit in with the style of the rest of the house, fit the space where it will live, be constructed to last (no dowel joints).
Looking at my track recorded, I should have the designs finalized by the end of summer...