Monday, June 28, 2010

Candle Rack - Part V


Okay, time to get this candle rack finished. Well, almost finished :)

The front of the case has two rails: one at the very top and one at the bottom of the candle till...

Wait! Stop the presses! That's it! Candle till! CANDLE TILL! That's what this thing is! The name has appeared! Yes!

...just above the drawers. I decided to mould the inside edge of both rails for some visual interest, but I didn't want to get too complex because the candle till :) design is rather understated, in a "Shakerish" kind of way. In the end I went with a simple side bead, and was quite happy with the result.

Here's the tools I used for this step:


The #3 smoothed the surface and edge prior to the moulding being stuck. The 1/4" side bead plane by Andruss (Newark, NJ 1821-41) did what it was made to do over a century and a half ago - amazing!* The Veritas medium shoulder plane I used to clean up a little tear-out in the quirk shoulder by adding a very tiny bevel to the arris. In front of the planes is the finished rail.

* Side note: I'm pretty sure this is one of the original group of planes that started me down the moulding plane path in a big way. You can click on the new "Moulding Plane" link in the "Post Categories" section in the left navbar for more on this topic.

The rails were glued to the case while it was being held in the front vise, allowing easier clamping. Here's a shot of the bottom rail being attached.


The next step was the pediment. In my original plan, the pediment was going to be an ogee or cyma curve. But now I was reconsidering.

I created the blank...


...and toyed with the idea of just going with that. But it didn't feel right - too plain and it didn't fit with the curved front of the case.

So I wanted a curve, which I could have worked out with a batten, as I did with the front, but instead I reached for some curve templates:


What? Doesn't everyone keep a Crock Pot lid and an angle food cake pan handy in the shop?

After tracing both curves on the blank and looking at it on the case, I chose the elliptical curve (Crock Pot). Then it was just a matter of shaping the curve with a drawknife and spokeshave.


After that, it just needed to be glued in place. The only tricky part was I wanted it to be attached before the back went on, so I could use the underside of the top to clamp it. As I wanted the back and the pediment to be flush, this meant I needed to make the back so that I would know how thick it would be and then give the pediment the appropriate overhang.

So, time for the back. I brought the thinner stock left over from resawing the case sides (roughly 1/4" - the sides are 1/2" thick) over to the bench and transferred the dimensions directly. I left it slightly oversized and would plane it flush after it was attached.


I also needed the thin stock for the angled back of the till section, so I made a cardboard mock-up to determine the correct size. The short hunks of dowels, with orange paint streaks from their days as part of a pipe clamp rack, are standing in for candles.


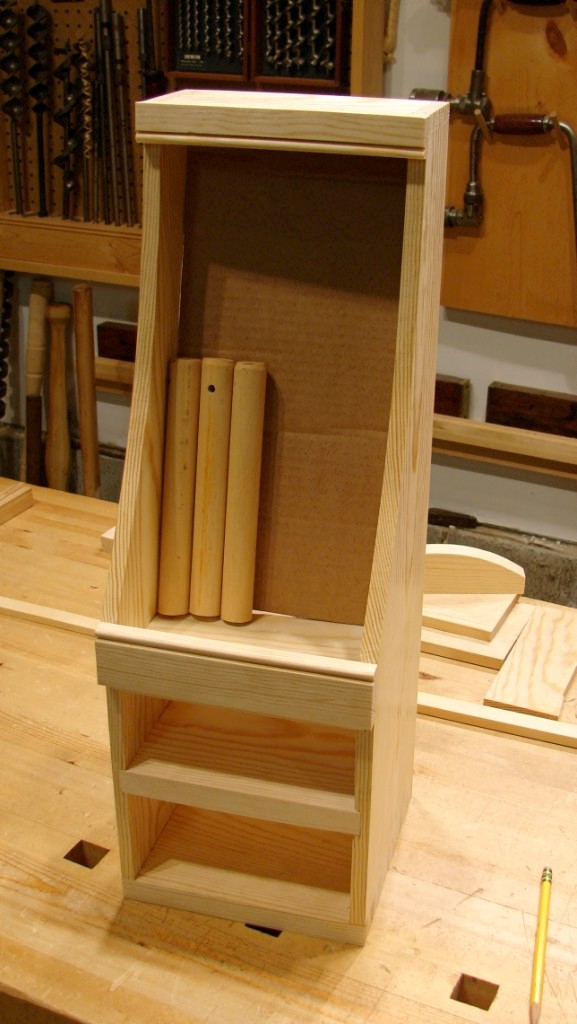
Once I was finished adjusting the cardboard to get the correct angle and fit, I used it as a template and cut the stock with a knife.


This worked great, much better than trying to saw the flexible wood, but I was a little to aggressive and split off a chunk that ran inside the line - drat! Oh well, the candles will hide that reminder to take it easy.

I glued cleats across the back of the stock to stiffen it and flatten out some cupping it was developing. Because this was cross grain, I only glued the middle couple of inches - a bit of an experiment really, we'll see how it works out.


You can see the pediment, waiting in the background, asking "Weren't you just about to glue me on about an hour ago?"

Yeah, yeah. So I did - and then the back.


The back was nailed on, and here's the tool set for that job:


"What's that? Why yes, that is a 30.06 On A Stick™ and serial #000001 to boot! A true collectors item - thanks for noticing!"

And there it is - just waiting on the drawers...


Final Part VI coming SOON!


Monday, June 21, 2010

New High Caliber Woodworking Tool


"Necessity is the mother of invention." - Plato

"...but scrounging is the father." - Dan Klauder


- Begin Infomercial Announcer Voice -

Who doesn't love woodworking? It's fun and relaxing.

(Smiling man hammering nails in clean, well lit shop)

Until...oh no! That nail didn't drive straight!

(Smile turns to look of distress)

And it's down in the bottom of a very tight space! A hammer and nail punch simply can't reach it!

(Man tries unsuccessfully to drive nail back out with hammer and punch - hits own hand - drops tools and winces in pain)

Trying to pull it from the back will only make a mess!

(Man hammers screwdriver into the back of the case, splintering wood - throws tools down in disgust)

That project is finished!

(Man throws candle rack project into trash bin and turns out the lights)

But wait! All your hard work doesn't have to be ruined! Now there's a custom tool to fix this problem! Introducing...

The 30.06 On A Stick™!


This custom handmade tool, in the classic combination of hardwood and brass, will allow you to enjoy woodworking again!

Simply place the brass driver head, with the non-slip engraved pattern (Winchester 30-06 SPRG) on top of the errant nail, give the fully adjustable (saw not provided) hardwood shaft a brisk blow with your hammer of choice, and Bob's Your Uncle! The offending nail is driven back from whence it came and is now easily removed by hammer claw, pliers or other nail pulling device!

(Man - holding 30.06 On A Stick™ - slowly nodding head and looking at completed candle rack project with proud, self-satisfied expression)

Order before midnight tonight and we'll send you The .22 On A Stick™, perfect for travel or job site use, at no additional charge! Call now!

- End Infomercial Announcer Voice -


I'm hoping that maybe InventHelp will help me market this to Lie Nielsen or Veritas. Or maybe even Stanley, now that they appear to be interested in making quality tools again.

PS - It is critical to operator safety that the 30.06 casing be EMPTY before adapting to this use!


Tuesday, June 15, 2010

Candle Rack Continued (Part IV)


Time to get back to work on the candle rack (I'm still not happy with that name). Last time I worked on the dovetails and now I needed to make the dados that house the drawer dividers. After that, the case could be glued.

First the layout. I made sure to mark which side of the line the dado was supposed to be on. It's too easy to make a mistake if I don't do that.


I didn't actually lay out the lines with the sides in this position. I marked them separately and then book matched them just to double check that I had everything right.

I prefer using a dado plane to create the dados, although there are a lot of other ways to get the job done. To guide the plane, I nailed a batten across the stock aligned with the layout line. The batten must be to the right of the plane, as the left side has the depth stop. I had to be sure the stock was oriented correctly so that the small nail holes from the batten were located on the inside of the drawer openings.


Job complete:


The Gramercy holdfasts kept everything locked down tight - they are great. I used the medium shoulder plane to tweak the bottom of the dados, which were slightly out of square. I need to reshape the iron of the plane a bit to fix that problem. It was a replacement, and it isn't quite right yet.

One more check:


At this point, I glued up the dovetails, then measured dado to dado to determine the divider width. After that, I cut the dividers to the correct width but left them deeper than needed. This allowed me to leave them proud and plane them flush, front and back, after glue-up.

Hey, it's starting to look like something!


Next I'll work on the back, the angled candle rest, and then on to the drawers.


Sunday, June 6, 2010

Rainy Day Project


Well, I should have the back deck, phase two, completed by now, but no. Actually, "phase two" is just another way of saying "all the work I didn't finish last summer like I planned." Hmm.

If things had gone like they should have, I'd have cracked on like smoke and oakum and we would now be enjoying the midnight sun on the back deck. But sunny day after sunny day slipped by as I did this and that. When I did try to work on the deck, I first had to figure out what the heck I was thinking when I last stopped. That took most of one day. Then, I had to undo some mistakes I made after misinterpreting what I had been thinking when I last stopped. That took another day. Then I realized that I never ordered enough decking. So I ordered it. It came. So did the rain.

So, I worked in the shop instead. Yea!

While rethinking the deck, I found I had an unneeded pressure treated 4x4. I decided that it should replace the street address post at the end of our driveway - which truth be told was a 1x3, sharpened to a point, driven into the ground with our address scrawled on it with a Sharpie (or possible a Sir Marks-A-Lot). This new post would have spiffy reflective numbers and a decorative cap. The numbers came from the Borg, but the decorative cap was going to come from my shop.

I wanted this to be a quick project, so I worked rather fast and loose, which was actually fun. First I needed to create a horizontal element. For this I wanted a square that would overhang all the sides of the post evenly. Instead of measuring, I used the sliding extension on my folding rule to capture the difference between the width of the stock and the width of the post...


...and then directly transferred that to the face of the stock (marked a line, set the post section to the line and added the extension distance) to determine the correct length to cut. Could I have measured? Sure, but it would have been slower and no more accurate.


I should point out that I wasn't concerned by the rough edge of the board I was using as I planned to round it over. In the end I didn't like how it came out, but if you look closely you can spot it in the background in a later picture.

As the stock I was using was an off-cut from the deck, it had kerfing on one side. This wouldn't do. Time for the scrub plane!


The scrub, followed by the jack, and the stock was ready to go. I used to clamp everything I planed between a bench dog and the vise dog in my end vise. Over time, I've switched to doing most of my planing with the stock just butted against a bench dog, as shown here. Even with side-to-side adjusting (not needed as often as you might think) it's much faster.


Next, I wanted to make a pyramid to top the cap. Some quick layout, and sawing, followed by the trusty jack and there it was:


It was at about this point (no pun intended) that I scrapped the rounded over look for the horizontal square. I decided to make another, and wrap it in mitered moulding. So I dug out the sticking board, selected a profile and got to work.


My sticking board has a built in miter box in the fence, which is handy, if not too accurate.


Lurking in the background is the stair nosing plane I used to round over the edges of the first square.

Since my miters were not great, I needed to adjust them with a chisel. The sticking board made a handy fixture for this.


It is also great for holding the work while drilling, such as for these pilot holes for the nails in the moulding. The fence holds the stock securely with no need for clamping. I do this often, as you can tell by the number of holes in the sticking board.


In the left background is the first square I made, in the right background is the second one, with the first piece of moulding already in place.

I added two more layers of moulding - a thumbnail above the square, and a dropped ogee below it. They came out a little rough, a combination of fast and loose working and not so great stock selection (I ripped some sticks from another decking off-cut). Here's the final cap with all elements in place:


And here it is in place on the actual post at the end of the driveway:


The tool kit used on this project (missing the sticking board).


One of the things I liked about this project was the reminder about the place of perfection. There is a lot more going on in a piece than just perfection of each part. Imperfect parts can be put together into a pleasant whole; perfect parts can be assembled into a ghastly whole. I think the whole (including proportion, character, sense of place etc.) has the overriding influence. Of course, perfect parts can help create a better whole...

P.S. - If you are sharp eyed, and a bit of a photo details nerd (like me), you may have spotted the elusive candle rack on the bench in several photographs. Yep, I'm still working on it...