Thursday, January 28, 2010
Saw Storage Upgrade
Recently I decided to change the way I store some of my saws. My old way was working fine, but I was ready for an upgrade that would make me happier. First let's look at how I had been doing things.
I organize the saws in my shop into two groups: those used with the saw bench, and those used at the main workbench.
The first group live in my saw till:
I'm not going to change the till. I'm very happy with it. It hangs on the wall near my saw bench, and keeps the saws conveniently within reach. These are rip and cross cut hand saws. Why so many? Well, having various ppi, set, length etc. can sure add up. But honestly, I'd have to say that five of these saws handle some 95% of my work at the saw bench.
The second group of saws consists of cross cut and rip backsaws, dovetail saw, coping saws, a funky compass saw, hack saws, and some Japanese style pull saws and my turning and frame saw. Most of these saws hang on a wall panel at one end of my bench (the bow and frame saws hang on the wall next to the panel).
Here's a shot of the panel I've been using for years:
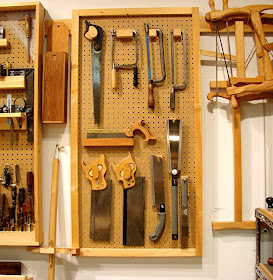
When I first decided to make the panels for tool storage in my shop, I went with peg board because I liked the idea of easily rearranging the tools as my collection grew. But I've always disliked the metal peg board hooks. I just don't like the way they look. So I made my own holding devices out of wood and attached them with screws from the back. The grid of holes made spacing and keeping things level easy.
Here's an image of the empty panel showing the various holding devices:
And here's a shot of the back showing the screws and washers:
This method has worked very well, and I highly recommend it to anyone looking for an affordable, relatively pleasant looking, easy to build, customizable, tool storage system.
But the peg board had served its purpose. After years of use and adjustment, I knew what I wanted and how best to arrange it - for me it was time to move on. My new panel would be solid wood and much nicer to look at on a daily basis.
I'll talk about the new panel in my next post.
Saturday, January 23, 2010
Kaija's Project
Over the holidays, my niece Kaija worked on a project in the shop. She made a "grease pot" a la Roy Underhill, although I don't think hers will hold tallow.
We pretty much followed Roy's method (which you can watch here) with a few minor changes. I made one as well, staying one step ahead, to use as a tester for problem solving. Kaija did all her own work and was a very fast learner. We had a blast - I can't wait to do it again!
I think I'll let the pictures tell the story (click for larger views):
Thursday, January 21, 2010
Shop Apprentice
Saturday, January 9, 2010
Curious Rabbet Plane
This funky little rabbet plane arrived in the mail the other day. I saw it last week on eBay, and though I really didn't need it, there was something quirky about it that I liked. So I put in a low ball bid and won.
The first thing I noticed when I got my hands on it was that not all the decorative surface line carvings were actually carved. Some of them were drawn on in ink. And some were actually joints in the wood. Huh?
A closer look revealed that the top was composed of three layers of wood laminated together. The center layer is an extension of the bottom of the plane. I don't think you can see that in the following pictures, so you're just going to have to trust me:
So the body of this plane is really made of six separate pieces of wood. The lower section with the attached upper center layer was cut into two parts to create the mortise for the iron. Then the two cheeks were attached and the two parts of the sole "boxing" were added. For some reason I thought laminated planes were a relatively new idea. Hmm.
I also discovered that the "boxing", which I first thought was purpleheart, was in fact some strange material. Bakelite? Masonite? I'm not sure.
Here are a couple of shots of the throat area of the plane. You can clearly see the glue lines where the separate pieces of wood (birch?) are laminated:
At 8 1/2" long, it's shorter than my other rabbet planes, but works great after I sharpened the iron. With no maker's mark or owner's marks, it's hard to judge the age. My feeling is that it is on the old side, although the laminated construction is confusing. All my other rabbet planes are made from a single piece of wood. But, I did just see another old rabbet plane on eBay which looked like it might also be of laminated construction (and it too had a "boxed" sole), so maybe laminated rabbet planes are an old tradition and I just never noticed them before? And I did see a plane with very similar surface markings that also had a "Germany" stamp on it, so maybe this is European?
Overall, it's a nice little plane that arouses my curiosity. Anyone have any insights or ideas on this? I'd love to hear them.
Friday, January 1, 2010
Two Gifts From the Shop
The last post focused on process, so to keep things fair this post will be all about product. Okay, fairness has nothing to do with it really - I was just so pressed for time finishing these gifts before Christmas that I didn't take a single picture of making them. In fact, I didn't take a picture of Rebecca's frame at all, but she graciously took a picture of it hanging on her living room wall down in Oregon.
Here it is:
It's an Oxford frame, and very similar to the one I posted about in the past. There are two differences: this frame has angled rail ends; and the cross-lap joints where offset so that the stiles project slightly. And yes, that's more oak salvaged from the library chair.
The second project was a trivet for my wife Celena:
And a detail shot:
While I did enjoy the shop time spent making these gifts, on these projects the final product was what it was all about. Which makes sense, since these were gifts, the recipients didn't really benefit directly from the process.