Showing posts with label Design. Show all posts

Monday, February 11, 2013

Buffet


Here's the situation:
  1. We need a small cabinet, or sideboard
  2. I have my parents' old buffet
  3. It needs a lot of work
  4. It has been waiting patiently for over twenty years
  5. It is too long for the spot we have for it

So, I got to thinking, why not shorten it while I fix it? How hard could that be? What a great idea!

Now I know what you are thinking. You're thinking that is a major undertaking and will certainly take much, much longer than just fixing the buffet. Well, that is what you should be thinking, and if you are not, you too have no time reality. You should probably see someone about that - dangerous thing - bound to get you into trouble.

Anyway, you're right - it will take longer. But I'm going to do it anyway. Life is too short to worry about saving time. (See what I mean about getting you into trouble...)

Here's a shot of the existing buffet:


And here's a mash-up of my first idea:


But it was still coming out too large, so I think I might go the asymmetrical route with the doors and create something along these lines:


Oh, and just in case you were wondering, here's the label on the back of the buffet:


The Ebert Furniture Co. started out in Philadelphia in 1854, then moved to Red Lion PA, before shutting down in 1959. I'm not sure how old this particular buffet is, I always though it was from the 1940's, but my brother says it used to be our great grandfather's so maybe it is older?

I think it will be nice to get this back into use.

Tuesday, October 2, 2012

Birch Spurtle


I recently rediscovered how much I enjoy eating oatmeal in the morning, and as I have been experimenting with making the real stuff, and not the "quick" (sorry William Penn look-a-like guy), I thought it would be fun to try making it with the traditional stirring tool - the spurtle. Or spirtle. Or thible. Or thivel. Or thyvelle. Or - never mind, let's just stick with spurtle (pun intended).

I started to look at designs on Google, but in the end I did what I almost always do and just let the tools, wood, and my hand guide me.

Here's the birch I started with - it's an air-dried scrap from a local saw mill that's been hanging around my shop for a couple of years waiting for me to start eating oatmeal again:


And here's what it became on the shavehorse:


Egads! Sandpaper! Yup - deal with it...

Here I'm demonstrating the intended grip for use stirring the porridge:


And a different angle showing how the form of the handle evolved - it is curved on the back to nestle into the web between my thumb and index finger, and has two angled planes meeting in a raised ridge or arris on the front that matches the crook of my thumb.


I tried it out the next morning with some Bob's Red Mill Steel Cut Oats and it worked like a charm - added some Vermont maple syrup - mmm, mmm!


Sunday, August 26, 2012

Cool Old Tool Chest


Okay, it's pretty obvious I haven't done much with the blog lately, which sadly means I haven't done much in the shop lately either. It was a summer of travel and training, and while both were excellent, it was way, way too much. Now I'm back, but school has started up again and I'm buried.

But, I've finally had a chance to dig through the pictures I took this summer and before I go in and work on my classroom, I'm going to do a post.

As I said, I had training this summer, and it was in California. Not being one to drive by a store or flea market that "just might have old tools", I did squeeze in a little tool hunting. I didn't find much, but here's something of note.


According to the tag, this tool chest belonged to someone who worked for the Murphy Bed Co. I thought the unfolding design was pretty cool.

Here's another shot:


It was probably a good thing that I had to fly home, or it might have followed me, and I really don't need another tool chest, even one this cool. Which reminds me, I did buy a new chest last spring and I never posted on that one. Soon, maybe...


Wednesday, October 13, 2010

Frankenchest - An Argument for Painting Wood


Before I even get started on this post, I should point out that the majority of projects that leave my shop (and those that stay) are not painted. I really like the look of wood, either unfinished, or oiled/waxed. But sometimes paint is the finish of choice and here is a perfect example of why.

I finally finished dismantling the old wood rack. But what to do with the wood? I didn't want to store it and it didn't feel right just burning it in the wood stove - "Well, thanks for the years of yeoman's work old rack, now it's off to a fiery doom for you! Muwahahahaha!" And we did need some kind of firewood storage for on the front porch, so...

Enter the Frankenchest!


This was a down and dirty salvage build, so material wise nothing is particularly nice about this project. The 3/8" plywood is rough CDX salvaged from the old rack's shelves. The 2x4 internal frame also comes directly from the rack. The skirting is birch ply from the long gone CD shelves, and the 1x stock for the upper trim was pulled from the scrap pile. In short, the wood is a mismatched hodgepodge. However, the proportions are not bad - maybe even nice, which is why painting this monstrosity makes sense.

Paint unifies the design, hiding the wood's grain, texture (somewhat) and coloring, and thus allowing proportion to dominate the viewer's perception of the final product. This is, I believe, the reason Windsor chairs were traditionally painted. Of course, we're talking about a Frankenchest here, not some fine Windsor chair, so the results are not exactly the same, but I think you can see the difference:


Yeah, it would take more than paint to make this baby shine, but it does take it from rather hideous to "not too bad", which in my book definitely does "Give it more juice!" (NOT a woodworking related link, and jump to 8 minutes for the scene with the quote - spoiler alert if you haven't seen this movie yet...)

And yes, this is the second, huge, green chest I have built recently - I think I should be good for a couple of years at least. Although, a huge, blue chest might be nice...


Monday, July 26, 2010

Candle Till Part VI


Well, it's finally finished! I like small projects, but it always surprises me how they are not much faster than large projects - at least for me.

I really had only two tasks left at this point: the drawers, and the hanging mechanism. Both of these had problems I had never faced before, and this made things interesting. I tackled the drawers first.

Way back when I designed this candle till, I made sketches of various drawer designs. I decided on overlay drawer fronts as they gave the lower case an unbroken, unified appearance that I liked. This meant I could build the drawers first, and then attach separate fronts. Earlier, when I had been dividing up the stock, I set aside two pieces with the grain pattern I wanted for the drawer fronts.

To get the stock for the drawers, I resawed a 1x4 into two boards of equal thickness. After losing some wood from the original 3/4" to the saw kerf (which is quite minimal with the bandsaw blade I use for the web), and then a little more after planing the rough side smooth, I ended up with two boards that were each 5/16" thick. I felt this was about right for tiny drawers like these.

The next thing I should have done was plow the groove to hold the draw bottoms while the stock was still full length. But I was over-eager and skipped that step - cutting half of the stock into the shorter lengths needed for the drawer too soon. Oops!

I don't have a bench hook for crosscutting smaller stock, instead I use this set up:


The scrap piece protects the bench, while the dog holds everything steady. Sometimes I use two dogs. The small piece on the right is the leftover stock. The front and back pieces, and the longer sides are matched up just to the left. Two of the pieces in the stack just behind the saw handle are the drawer fronts.

Before I plowed the grooves, I needed the material for the drawer bottoms. I would be using a 3/16" iron in the combination plane to plow the groove so I resawed a panel 7/32" thick to make the bottoms. This would be beveled to allow it to fit into the slightly smaller grooves.

First I set the marking gauge off the iron and did the lay out for the resawing:


After resawing, I cleaned up the stock with the jack plane. I was not trying to make it prefect, it's the underside of the drawer bottom - just enough to keep things flat.


Then it was time to plow the grooves. Here's the drawer parts that I cut too soon. Notice the chalk reminding me where to plow the grooves. If I had marked them earlier, I probably would have remembered not to crosscut them before grooving. Hmm.


With the parts already cut short, I was only able to use one holdfast (without drilling a new hole in the bench), which made it a little tricky. But it worked, as long as I really set the holdfast tightly, with a solid blow from the maul. The thin wood cushioned the stock so it didn't get dented.


With the longer stock, everything was easier as the holdfasts work much better together.


At this point here is what I had: grooved sides, fronts and backs; bottom stock waiting to be sized; and the actual overlay fronts.


I cut rabbets in the side pieces with my standard saw/chisel/shoulder plane method, and then dry fit and clamped the drawers together. This allowed me to measure the drawer to fit the bottom.

I cut the bottoms to the correct width with a knife (much easier than a saw on such thin stock) but left them long length (depth) wise. I built the drawers slightly shorter than the case was deep and I wanted these extra long bottoms to support the drawer flush to the case front while I worked on attaching the overlay fronts. Then I would plane them back a bit to allow for expansion later. (I think this will make more sense in a few more steps...)

I planed bevels on three sides of the bottom to allow for a snug fit in the grooves. They might be hard to see in this picture.


I only needed bevels on three sides because the drawer back got cut off just at the groove to allow for the bottom to pass under it and allow for expansion. Again, it was simple knife work.


Glue up:


And the finished drawer waiting for fitting:


After getting a very tight fit by careful planing, it was time to set the drawer flush to the front. Here's where the extra long drawer bottoms helped me out. I pushed the drawer in as far as it would go - until the bottom hit the back of the case. Then I used my folding rule's extension to transfer the distance the drawer stood proud...


...to the back edge of the drawer bottom.


After planing off that much of the bottom - Bam! - a perfectly flush drawer. No messing around with repeated fittings etc. Cool!

Oh, and yes, I did figure out a way to get the snug drawers back out again. I drilled a small hole in the back of the case and used a short length of dowel to push it out. As a bonus, this hole lets air out as the drawer is pushed in.


To align the overlay fronts, I used two nails driven through from the inside of the drawer. Once I had the overlay front in the position I wanted, I pushed it firmly onto the nail points. This created a physical registration for putting the fronts back on again later, and also kept them from sliding around while I glued them.


My original plan called for small turned pulls, but in the end I switched to simple curved pulls, that echoed the curve of the pediment. Here's a shot of the almost complete till:


Now all that remained was to create a way to hang the till on the wall. I ruled out screw eyes and wire, as I wanted the till to hang closer to the wall. In the end I decided to make a notched metal plate that would be mounted over a hole in the back of the till. This would fit over a Lee Valley picture screw.

I fashioned the metal plate from the flattened bottom of a soup can. Here's a shot of the finished hanging plate and the tools I used to make it. The picture screw is also visible.


The vertical positioning of the hole was somewhat arbitrary. Horizontally, I wanted to be on the center of balance, but of course that would be changing with the contents of the till and shelves, which is why the hanger has three notches. After doing the layout for the hole in the back of the till, I drilled holes through from the back, and then flipped it over and chopped it out from the inside, removing the angled till back first, and using the holes as a guide.


Another challenge was how to fasten the hanging plate to the 1/2" thick back. I thought about tiny screws, or clench nailing, but in the end I dug up some copper tacks for a Shaker box project that hasn't happened yet. I wasn't sure if they would be strong enough, but I tested it out on a scrap piece and they held like crazy!

The hanging plate mounted:


The chuck of 4x4 was used to support the underside of the back while I hammered the copper tacks. The needle-nose pliers were used to hold the tacks, which are very tiny and extremely sharp.

Finally, the completed candle till hanging in its new home:


I'm very happy with the outcome. Obviously I decided not to paint it - once again changing plans during the course of the project.


Monday, June 28, 2010

Candle Rack - Part V


Okay, time to get this candle rack finished. Well, almost finished :)

The front of the case has two rails: one at the very top and one at the bottom of the candle till...

Wait! Stop the presses! That's it! Candle till! CANDLE TILL! That's what this thing is! The name has appeared! Yes!

...just above the drawers. I decided to mould the inside edge of both rails for some visual interest, but I didn't want to get too complex because the candle till :) design is rather understated, in a "Shakerish" kind of way. In the end I went with a simple side bead, and was quite happy with the result.

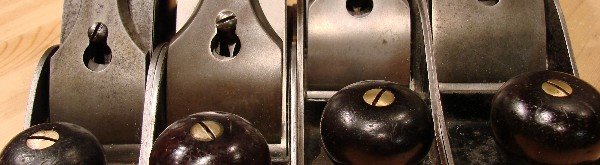
Here's the tools I used for this step:


The #3 smoothed the surface and edge prior to the moulding being stuck. The 1/4" side bead plane by Andruss (Newark, NJ 1821-41) did what it was made to do over a century and a half ago - amazing!* The Veritas medium shoulder plane I used to clean up a little tear-out in the quirk shoulder by adding a very tiny bevel to the arris. In front of the planes is the finished rail.

* Side note: I'm pretty sure this is one of the original group of planes that started me down the moulding plane path in a big way. You can click on the new "Moulding Plane" link in the "Post Categories" section in the left navbar for more on this topic.

The rails were glued to the case while it was being held in the front vise, allowing easier clamping. Here's a shot of the bottom rail being attached.


The next step was the pediment. In my original plan, the pediment was going to be an ogee or cyma curve. But now I was reconsidering.

I created the blank...


...and toyed with the idea of just going with that. But it didn't feel right - too plain and it didn't fit with the curved front of the case.

So I wanted a curve, which I could have worked out with a batten, as I did with the front, but instead I reached for some curve templates:


What? Doesn't everyone keep a Crock Pot lid and an angle food cake pan handy in the shop?

After tracing both curves on the blank and looking at it on the case, I chose the elliptical curve (Crock Pot). Then it was just a matter of shaping the curve with a drawknife and spokeshave.


After that, it just needed to be glued in place. The only tricky part was I wanted it to be attached before the back went on, so I could use the underside of the top to clamp it. As I wanted the back and the pediment to be flush, this meant I needed to make the back so that I would know how thick it would be and then give the pediment the appropriate overhang.

So, time for the back. I brought the thinner stock left over from resawing the case sides (roughly 1/4" - the sides are 1/2" thick) over to the bench and transferred the dimensions directly. I left it slightly oversized and would plane it flush after it was attached.


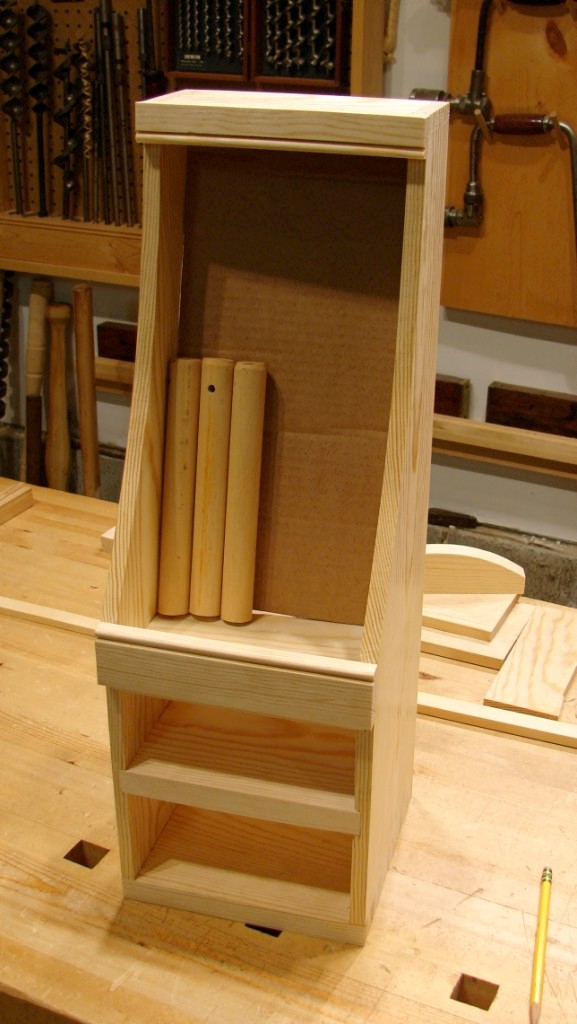
I also needed the thin stock for the angled back of the till section, so I made a cardboard mock-up to determine the correct size. The short hunks of dowels, with orange paint streaks from their days as part of a pipe clamp rack, are standing in for candles.


Once I was finished adjusting the cardboard to get the correct angle and fit, I used it as a template and cut the stock with a knife.


This worked great, much better than trying to saw the flexible wood, but I was a little to aggressive and split off a chunk that ran inside the line - drat! Oh well, the candles will hide that reminder to take it easy.

I glued cleats across the back of the stock to stiffen it and flatten out some cupping it was developing. Because this was cross grain, I only glued the middle couple of inches - a bit of an experiment really, we'll see how it works out.


You can see the pediment, waiting in the background, asking "Weren't you just about to glue me on about an hour ago?"

Yeah, yeah. So I did - and then the back.


The back was nailed on, and here's the tool set for that job:


"What's that? Why yes, that is a 30.06 On A Stick™ and serial #000001 to boot! A true collectors item - thanks for noticing!"

And there it is - just waiting on the drawers...


Final Part VI coming SOON!


Sunday, February 14, 2010

A Box for Blocks


For my son's first birthday I made him the Skunk Bench. For his second, I'm making him a set of blocks. Of course, I hadn't been working on the blocks for very long when I realized that they would need a place to live. Bam! New project!

I decide to make a chest. I looked through Lon Schleining's excellent book Treasure Chests and saw several "sea chests" that inspired me. Of course, I had to change things; it's what I do.

Some changes come from my design muse, some from problem solving during the construction process. I like it when the changes provide a certain amount of "funky" or "quirky" character to a piece - it keeps things interesting. I've posted about this before.

I sketched out a rough design and went with a raised panel bottom set in grooves in the sides and ends. On a chest this size, I think it would be more common, and arguably better - as it would have not stolen from the depth of the interior, to just nail on a solid bottom. But I liked the idea and how it makes the box different.

Once I started building, a couple of other changes appeared. First I didn't have wide enough stock to make the top out of one board, and rather than gluing up wider stock, I modified the top design completely. Then, after numerous attempts at modifying the handle hardware, I threw it away keeping only the bails; and replaced the mounting hardware with simple eye screws. All the hardware I blackened with a linseed oil patina that I first experimented with back on the Turning Saw project. After seeing the blackened hardware sitting on the raw wood of the box, I liked it so much I abandoned my original idea of painting the box.

After deciding not to paint the box, I also decided to leave the nails exposed, and to use wrought head nails to attach the hinges. This was the first time I'd used the clench nail technique, and I had mixed results. The nails I had were either too short or too long. As nails that are too short are not clenchable, I went with the too long option - but things got messy. In the end, it worked, but it was not pretty...

One special thing about this project for my son was that I used a tool with family history. It's a hand drill from our hardware store, that my father gave me as a boy. I love the idea that there is a three generation connection in this project.

In the end, I think I created a functional box for the blocks, but one that has just the right amount of unique character to make it extra special for my son.


And finally, the traditional shot of the tool kit used on this project:


Not pictured: shooting board and miter box.


Wednesday, September 23, 2009

"Me Box" Part III


Okay, here's day two of the "one day" project...

After taking the box out of the clamps, it was time to clean up the joints. Not too bad - it just fit in the vise. I was careful not to put too much pressure on it and pop a corner, and with the box resting on my saw bench, it really didn't need much clamping pressure to be very steady.


Now it was time to make the lid. I could see the end of the project in sight - the lid was a straight forward affair - just cut to width, three rabbets and done. I'd be finished in less than an hour, what could happen?

I used the extension slide on my folding rule to measure the width of the lid from the bottoms of the two grooves.


After getting the dimension, I marked the lid stock for ripping. Normally, I true an edge and then use a panel gauge to mark the waste to be cut off the far side. Here however, I wanted the grain pattern to remain centered on the lid. So I trued one edge, made the second parallel, and then marked in from both edges 1/2 the amount to be removed. A little more work, but it made for a much nicer looking lid.


I ripped the two edges off. I tried to rip as close to the lay-out lines as possible without removing them.


Then I used a plane to work down to the gauged line. I love how the cut line itself shows you when you are close by peeling up in a long curl. If both arrises peel at the same time, the edge is working square. As you can see in this shot, most of the left arris had already peeled - telling me that I was slightly out of square - easy to fix in a few passes of the plane.


With the lid cut to size, I planed the rabbets and gave the lid a test fit. Too tight.


A closer look revealed that all four surfaces needed to be relieved slightly.


I took it very slow - too much removed and the lid action would be sloppy. I knew from experience, that the perfect fit would feel too snug at first, but after several times of sliding in and out, it would loosen up a hair and be just right. However, I also had to think about movement. It's been very damp here lately and the relative humidity is right around 75%. But all too soon, the temperature will plummet and the moisture content will drop with it. By the middle of winter the relative humidity will be down in the low teens and the lid will shrink a little, so I wanted to make it as tight as possible now, but still remain functional.


Several test fits, with minimal planing between, and the lid slid home.


I was done! Mostly anyway. Just peg the joints and add the handles. And even though I was behind schedule, I had so far managed to stick to the general plan and not over complicate things with new ideas.

But - one problem. I didn't like it. I found it - well boring. Bummer.

Not that it wasn't a nice box - it was. It just didn't have much in the way of character. I didn't feel like this box represented "me". It needed something, but what?

I looked at it from different angles. I mocked up various moldings. I thought about building a skirt or low base. I tested out some feet ideas. Nope, nope, nope and nope. Nothing was making me happy.

Then I turned it over. Hmm. The piece I had used for the bottom had been slightly thicker then the rest of the stock. Because of this, the bottom had extended below the sides and the piece needed to be reduced in thickness. Since it was the bottom, and this was a quickie project, I hadn't bothered to remove the scrub plane tracks before glue up. I looked at them now and realized I kind of liked the way they looked. Hmm. What if I did something similar with the lid...

I was already a day over schedule and here I was complicating things. If I messed up the lid, I'd have to make a new one, out of different stock, which wouldn't match the rest of the box. Plus, it would take another day and I wouldn't be able to present to my students. What should I do? I took a deep breath, and had at it.

Here's the results after the scrub plane - a lot of tear out is visible in the raking light.


Time for a round plane to earn its keep. Here's a shot about half finished with the #14 round plane:


And here it is finished - and I could breath again - the idea had worked out great:


And here is a shot of the bench at the end of the lid shaping process. You can see a test piece leaning against the maul behind the finished lid. Part way through I was still getting tear out (I was sure it was ruined) and I had to stop and sharpen the plane blade. I used this piece of scrap to check if it was successful - thankfully it was. I love the shavings that the round plane made. Freshly sharpened, and set very fine, this 150+ year old plane was a true joy to use. Thank you J. Kellogg! Best of all, the new and improved lid gave the box the character it was missing. Yes!


The lid still needed finger notches, which I cut with a chisel:


And I made a template to help with boring the holes in the ends for the handles.


After that, I pegged the joints, gave it a quick rub with oil, and added the handles. Done! And in only about triple the time I had allotted. Not bad :)

Here are some shots of the finished "Me Box":


And some detail shots:


I loaded it up with my "me" items (packed in the shavings from making the box), took it to school and presented it to my students. I was very pleased that the box itself told as much, maybe more, about me than the items I put inside. A "Me Box" indeed.