Thursday, June 27, 2013

Tool of the Month #4 - They Don't Make Them Like That Anymore...


Okay, so this tool of the month isn't exactly a woodworking tool. It was made for "linemen", and as such was designed for cutting and twisting wires. But it's still plenty useful around the shop, but its function is not the reason I picked it for Tool of the Month - its form is.
 
The instant I picked it up, my hand said "quality!". Then my eyes agreed. There is just something about the way this tool feels in the hand and appeals to the eye that I find pretty darn satisfying. I find myself picking it up just to handle it and feel the way it sits in my hands. A little silly, I know, but it's not an accident, someone made it that way and it's an uncommon thing these days.
 
I guess I find it to be tool art - uncompromisingly functional, but incredibly appealing in its shape, texture and heft. 
 
Anyway, here are the details as I know them:
 
Manufacturer: Kraeuter
Location: USA
Model: 1831-8  8" Lineman's Pliers
Year: 1924- '40's?
 
Here are some shots, but I don't think they will do it justice.


I think the condition of these pliers, after almost 100 years, is a testament to their quality. I also love the art deco grips. Kraeuter called these the "Don't Slip" pattern and began using it in 1914. Here is the patent on that design.


The "Kraeuter, U.S.A." on the inside of the grips wasn't started until 1924, so mine obviously dates from that year or later.


There is something incredibly pleasing, at least to me, about a tool that was created with pride, by a company that cared not only about how a tool performed, but how it felt and looked. It doesn't seem like there are many tools being made this way anymore - which is sad.


Monday, June 17, 2013

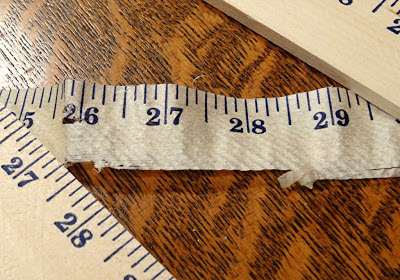
Silly Stuff: How to Make a Tape Measure


How to make a tape measure in two steps:
 
 
Step 1 - Get a yardstick*.


Step 2 - Get a plane.


Complete!


*Instructions intended for use in USA, Liberia, and Myanmar only!


Wednesday, June 12, 2013

Ugly Duckling Box

 
So I get almost all my wood at the BORG. The overall quality is low, but the thing is you can dig to your hearts content. With a little patience I can find almost perfectly clear stock, even quartersawn, but I can't count on it, so I tend to buy it when I find it and save it.
 
This particular story is different though. I didn't dig up this board, rather no one else wanted it. It was almost the last board left in the 1x12 stack when I got there, and as soon as I saw it, I had to get it. It looked so lonely! So it's been waiting in the shop for almost a year, and a few days ago I decided to build a box, or maybe I should say another box because I do seem to make a lot of them. Anyway, it was time for the ugly duckling board to shine! (Jazz hands!)
 
This box is a cross between my pencil box and the box I made to hold flutes (which apparently would also be cool for holding vinyl... although I don't know about that). If you want to see how I made this box, just check out those two posts.
 
Here is the finished box before oiling:
 

And here is why we oil wood - KA-POW!:


The other end:


And a few detail shots:


Man, I wish there had been two of those boards!


Saturday, June 8, 2013

Mystery Tool II


Well I've lost track - anyway, I think this is the second mystery tool...

I picked this up in the tool section at a local thrift store. It was in a box labeled "plane parts". It does appear to have the adjustment wheel from a Stanley block plane as one of its parts, but I really don't see how this could be related to planes function wise.

Take a look:


My first reaction was a homemade version of those screen door tools, but those are so cheap I'm not sure why anyone would take the time to make one. Unless, they were in a remote location maybe...

Oh, I forgot to say it's about 5 inches long.

Any thoughts?


Sunday, May 19, 2013

Second Apprentice


I've added a second apprentice!

Here is a shot of her training:


Too bad, she seems to be lacking in enthusiasm. :)

And here she is admiring the growing skills of apprentice number one:


Life is good!


Monday, April 15, 2013

One Hour Stool Part II


So it was time to paint the "One Hour Stool". I had already decided to paint it blue, but just to be sure I brought out the milk paint sticks. Yup, it still wanted to be blue.


I broke out the Real Milk Paint and mixed up a batch of sky blue. I wanted the paint to be somewhat transparent, so I adjusted the proportions to make it more of a wash.


After letting it sit for a bit, I painted up some scraps - Hey, those look like busted up legs from a small stool! Huh, wonder how that happened? Anyway, after they dried, I tested some various oil/wax combinations to see how they would change the appearance.


On the left, is my own beeswax/mineral oil mix. In the center, is Tried & True Varnish Oil. On the right, is Dark Tung Oil. I decided on one coat of the T&T Varnish Oil, and one coat of my own mix.

On to the stool.


First the paint.


Then the oil.


And it's done! I didn't keep track of time during this stage of the stool build. I'd have to estimate that the painting and oiling took about 45 minutes total shop time.

So I guess that would make this one hour stool a two hour stool...


Tuesday, April 9, 2013

One Hour Stool - Sort of...


One of the things I dislike about not having much time to spend in the shop is how the emphasis shifts to product, rather than process. "I don't have much time!" seems to be followed almost immediately by "I better get this finished!" I've tried to resist this, with limited success, but lately I decided to try a different approach - embrace it.

Hence, this project: The One Hour Stool. The ideas was simple - to see what I could whip up in one hour of shop time. It was fun, and frustrating, but somewhat successful. Let's take a look, with the timer running (times shown are the end of each step).

5' - Dug up some suitable scraps - got lucky with the curved parts left over from Clara's kitchen.


16' - Smoothed all the "show" faces on stock with smoothing plane (not shown)

20' - Whipped those curves true with the spokeshave.


24' - Added a 1/4" bead to the bottom edge (I didn't know it yet, but planted the seed of failure right here...more about that later).


27' - Stacked the leg blanks together (stepped) and used the drawknife and plane to put a bevel on the legs (top and bottom).


33' - Figured how much narrower the leg stock needed to be in order for the top to have a proper overhang (need that shadow line), and then reduced it down to size with a scrub plane and jack.


37' - Transferred the width dimensions directly from the rails to the legs, used a marking gauge set from the rail thickness to mark the depth, and brought the bevel angle down with a bevel gauge to lay out the notches in the legs for the rails.


43' - Cut the notches in the legs.


44' - All the stock finished. Oh, and somewhere in there I decided to put a bead on the top to ease the arris and to compliment the beaded sides - this took less than one minute (gotta love moulding planes!). But then I decided the legs needed feet, so....


49' - ...feet cut and...


51' - ...smoothed.


61' - I assembled the parts with glue and nails and...

62' - I ripped it apart due to a mistake!

Okay, remember back at 24' I mentioned something about "the seeds of failure"? Well, here's what happened. When I smoothed the curved ends of the sides I didn't bother to make sure the curves were exactly the same at opposite ends. I figured that as the sides were ganged together, the curves at each end would match and that opposite ends would be close enough. This probably would have been fine, except when I planed the beads, I didn't plane opposite faces which resulted in one side piece being reversed for assembly and then the opposite ends were paired. I'm not sure I'm making this clear, but trust me, it messed things up because I eyeballed the leg angle and placement by referencing the curve on the side pieces - which no longer matched... so after gluing and nailing I stepped back and "What?!" The whole thing was racked - from below the legs and sides made a trapezoid Hmm. Can't live with that... but with how to take it apart with the nails already set? Hmm.

Well, I solved that problem - I'll share it some other time. Then I had to remake the legs - which was okay because it let me make them longer, which improved the design.

So back on track:

63' (or about 83') - Drilled and pegged the set nail holes.


64' (84') - Done! The final stool.


This was a fun project and I like the lines of the little stool that came out of it. I also learned (relearned actually...) an important lesson about marking stock to keep track of orientation. You can see some of the fall-out from my mistake with the legs - the extra set of nail holes on the left. Oh well, maybe someday someone will have a bit of a puzzle out of that.
 
 
I'm going to paint it a happy blue color with milk paint and then let the kids play with it!


Friday, March 8, 2013

Hands and Spoons


A recent batch of student work from the school shop.

Made by hands - for hands:


Monday, February 11, 2013

Buffet


Here's the situation:
  1. We need a small cabinet, or sideboard
  2. I have my parents' old buffet
  3. It needs a lot of work
  4. It has been waiting patiently for over twenty years
  5. It is too long for the spot we have for it

So, I got to thinking, why not shorten it while I fix it? How hard could that be? What a great idea!

Now I know what you are thinking. You're thinking that is a major undertaking and will certainly take much, much longer than just fixing the buffet. Well, that is what you should be thinking, and if you are not, you too have no time reality. You should probably see someone about that - dangerous thing - bound to get you into trouble.

Anyway, you're right - it will take longer. But I'm going to do it anyway. Life is too short to worry about saving time. (See what I mean about getting you into trouble...)

Here's a shot of the existing buffet:


And here's a mash-up of my first idea:


But it was still coming out too large, so I think I might go the asymmetrical route with the doors and create something along these lines:


Oh, and just in case you were wondering, here's the label on the back of the buffet:


The Ebert Furniture Co. started out in Philadelphia in 1854, then moved to Red Lion PA, before shutting down in 1959. I'm not sure how old this particular buffet is, I always though it was from the 1940's, but my brother says it used to be our great grandfather's so maybe it is older?

I think it will be nice to get this back into use.

Wednesday, February 6, 2013

Clara's Kitchen


So here's what I was putting all my time into before Christmas - and of course it didn't get completely finished, but my daughter didn't care one bit!

From this:


To This:
To This:

Life is good!

But awfully busy...

I'll post some additional in-between shots and what it looks like at this point (nope, still not finished) soon.

Sunday, January 6, 2013

Tool of the Month #3


So first, this is late and is actually December's Tool of the Month (sorry), and second, this is really two tools, but there's a connection so I'm breaking my own rule (not sorry).

Here's the deal, I was frantically trying to get Clara's play kitchen finished in time for Christmas (that's another post...) and worked myself into a bit of a corner (so to speak). I was ready to install the bottom, which was going to be screwed down to cleats on the sides, but I needed to drill pilot holes to keep the cleat from splitting. On one side that was not a problem, but on the other the cleat for the bottom of the oven was just a few inches above the bottom cleat, and there was not much room to work. My hand drill was out, and even my cobbler's awl couldn't fit in there. Hmm.

I was just resigning myself to removing the upper cleat, which I really didn't want to mess with as it was glued in the middle (but not the ends to allow the sides to move) and I was not looking forward to dealing with that. Then, inspiration struck and less than two minutes later the holes were bored - sweet!

Here's the setup for tool #1:


The awl is a finish nail sharpened on a file and I think you can see what the handle is. It worked well with one hand applying pressure up near the awl, and the other working the handle back and forth. I love it when a problem can be solved by improvising with what's on hand!

So after solving that problem, I faced the second problem of driving screws in the same location. This one was solved by drawing on my deep reserve of tools. As you've probably noticed, I love old tools and will frequently acquire tools that I don't technically "need" but know will come in handy someday. This was one of those days.

The tool is a Mayhew 18" auger bit extension. I'm not sure, but I think this may be the same Mayhew Tools that is still around today. They started back in 1856 in Shelburne Falls, Massachusetts. If I had to guess the age, I say this was from the early 20th century - somewhere around the 1920's. But that's only a guess, and of course, I could be wrong.

What I really like about this extension is the very simple locking mechanism it uses. Basically, there is an inner cylinder with a tapered socket for the auger's square-tapered tang. That's the inner square you can see in the image below. The outer cylinder has a larger square opening rotated 45 degrees to the inner square. This outer square opening is larger than the tapered tang of the bit, but will lock down across the shoulders of the tang due to its rotation. In use, the outer cylinder is raised by means of a threaded collar, the bit tang inserted through the outer square, rotated, then dropped into the inner socket. All that remains is to screw the outer cylinder down until the bit is locked in tight. Very simple, and much easier to do than explain.

Here's the extension with both squares visible - the Lee Valley brace hex driver adapter I use is on the bench in the background:


Here's a shot of the adapter locked in the extension with a square drive bit fitted in the adapter:


And finally, the point of using this extension - it allowed me to use a much shallower angle of approach on the screw by moving the brace further away from the cramped location:


Here's a closer shot which should make it pretty clear:


With the brace set to ratchet, I had no problem driving the screws home. I love it when a problem can be solved by having just the right tool when you need it!

This was a pretty cool evening in the shop - hitting two of the things I love about woodworking, improvising tools and techniques and getting to use a special old tool, all in the space of about five minutes! A good evening indeed.