Showing posts with label Shop Stuff. Show all posts
Monday, February 26, 2018
A New Post from The New Shop!
Okay, it's really just a teaser - sorry. I know, I know...
But the new shop is almost done and I thought I'd post a picture or two. This was harder than I planned on as I couldn't remember how to do it! I hope this looks right.
Anyway, here is a little taste...
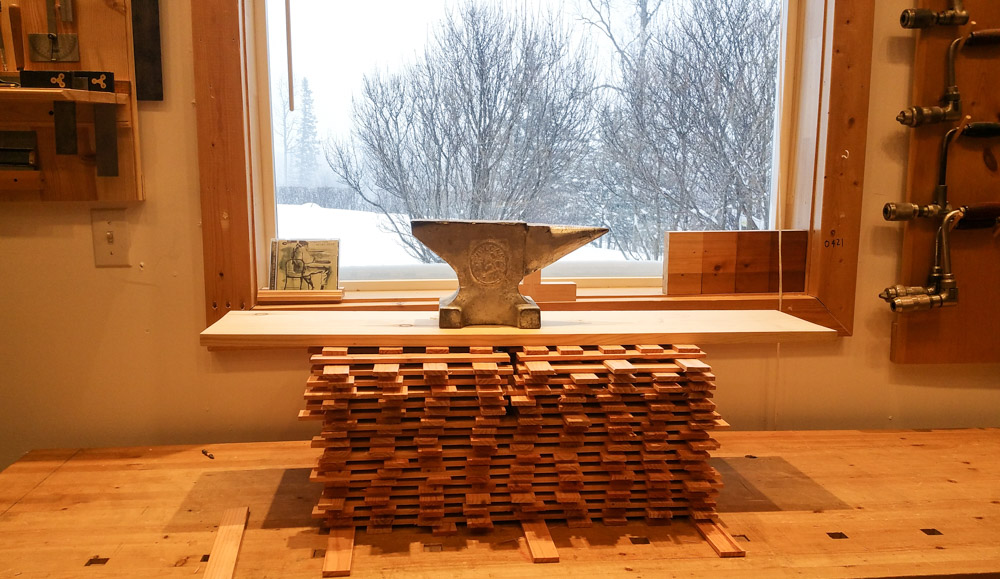
Oh, did you notice the crisp shadow? Looks like a shadow from sunlight? Yes! A window! I've only been wanting one of those for like 10 years!
Here it is (different day - no sun):
Those are new stickers for the wood rack. Same wood rack as the old shop, but I've accumulated more wood (how does that happen?). I'm changing from 3/4" to 1/4" which should let me have 3 or 4 more layers of wood per shelf. I don't think the reduction in air gap will matter too much as I am not drying wood on the rack, just letting it adjust to seasonal variations in humidity. We'll see.
Oh, did you notice the anvil? Well, the new stickers are cheap lathing strips from the Borg. Very cheap. Very wet. So they are drying under the anvil so they don't warp. Kind of ironic considering their purpose...
Oh, you noticed the jazz cd on the windowsill? Bonus points if you can identify it!
Oh, and what is the "0421" on the trim? No idea - it was there when we moved in...I wonder if there is a safe in the floor around here somewhere...
Okay, that's enough noticing!
More soon! ish!
Sunday, May 19, 2013
Second Apprentice
I've added a second apprentice!
Here is a shot of her training:
Too bad, she seems to be lacking in enthusiasm. :)
And here she is admiring the growing skills of apprentice number one:
Life is good!
Friday, October 19, 2012
Hammer Hanger
After posting about my latest tool panel, the one for miscellaneous tools, a reader asked for a more detailed shot and information on the hammer hangers. So, here it is.
They are made out of 2x stock, and are pretty straightforward to make and harder to describe in words.
First the layout: I put the hammer on top of the wood with the handle perpendicular to the bottom edge, and traced the underside off the head - under the bell and neck and down the left side of the cheek, and under the claw and down the right edge of the cheek. I extended a horizontal line across the gap where the cheek lines turned down toward the vertical. I also marked the top and bottom of the stock with thickness of the hammer head.
Time to cut: I cut the (mostly) vertical cheek lines with a Japanese saw, stopping when I reached the depth marks. Then, using a coping saw, I cut away all the wood above the traced line, following the horizontal line across the cheek cuts. It was short work with a chisel to remove the wood between the vertical cuts to make room for the adze-eye and the top of the handle.
That's it, well except for clean-up, which as you can see was pretty minimal, as I was not too concerned with perfection. Oh, and I did add a gate made from thin stock and counter sink screw holes for mounting the hanger on the panel.
I hope that helped.
Monday, October 8, 2012
Two Down, One to Go
When I removed the last pegboard tool panel in the shop I decided to reorganize things a bit. It was a real mix of tools, and is being replaced by three separate new panels. I completed the layout tool panel first, and now the second panel is finished as well. Yes! More than half-way done!
This one was for the "miscellaneous tools" - tools that are used too frequently to put in a drawer or chest. I wanted these right at hand, but arranged in a way that made more sense than the way they were on the old panel (actually, some of these were never on the old panel, but were "upgraded" to "frequently used" status during the planning and building stages).
Here it is:
You'll probably need to click on the picture to see it closer (well, if you're like me and such a total tool geek that you pore over photos trying to identify each and every tool ).
Now only the chisel panel waits to be finished - but it is going to be much more complicated, with a tambour front. I hope it doesn't take too long - at the speed I've been moving lately I'm already late getting started on Christmas presents.
Saturday, September 29, 2012
Last of the Pegboard Removed and New Layout Tool Panel Installed
It's been a long time getting here, but the shop is now "pegboard free" - wahoo! I've talked about this before, how I think pegboard has its place, but how I much prefer real wood.
When I was first setting up the shop it looked like this:
As you can see, with the exception of the brace rack, all the tools panels were pegboard.
Well, one panel at a time, I've slowly replaced the pegboard. The first up-grade was to the saw panel, then the drilling/boring panel *. Now it was time to tackle the largest and most random of the panels - the one in the center that was a mishmash of tools - some chisels, files and rasps, punches, mallet, knives, snips, squares etc.
I was just going to pull the pegboard from the frame and replace it with tongue and groove 1x12s. I started that process by slicing open the bottom of the frame with a slitting gauge. Then my apprentice, Teague, helped me slide the pegboard out of the frame.
Then, as frequently happens, I changed plans. I decided that what I really needed to make was three panels: one for layout tools, one for frequently used miscellaneous tools, and one for chisels. Anything from the original panel that didn't fit one of these categories would just have to find another home.
The first of the new panels would be for the layout tools. It was made the same way I've made the other panels, so I won't go into great detail on the process, but here is a brief photo summary.
First, the Stanley #48 was used to create the tongue and groove joints:
The three boards of the panel joined together and with the joint showing the approximate amount of shrinkage I get on my other panels in winter:
There's nothing wrong with just leaving the panel like this, but I prefer to make the gap less noticeable and a little fancier by beading the edge on one of the boards at each joint.
Using a moulding sample to decide which bead size I wanted to use to make the joint look better as it expands and contracts over the course of the seasons:
Beading with the 1/4" side bead plane that matches the sample:
And the final result, again set to the approximate maximum shrinkage and gap:
A close up shot of the same:
And the panel completed, hung on the French cleat system in the shop, and loaded with layout tools:
Again, there was nothing wrong with the pegboard version, but this one makes me happy when I look at it - which is something we seem to be lacking all too often in today's world.
*Okay, I guess I should read my own blog more often - then I would have remembered that I used the wooden T&G planes and that they worked better...sheesh. Oh, and to answer the question I asked at the end of the boring/drilling post - "No. More like soon as in almost two years!"
Saturday, February 25, 2012
Bench Leveler Feet - Mark II
I mentioned some time ago that I would post the shop-made leveler feet that I used on the benches at school. These are an improvement on the ones I posted about a few years ago. The main difference is that the whole jam nut adjustment system is gone. I went back to the original design (see link in first post) of embedding a nut in the leg. I also switched the hex bolts to carriage bolts, but I kept the shallow hole in the puck, just making it round instead of hexagonal. These are very simple to make and use.
This is all you need for each leveler foot:

Hockey puck, all thread connector nut, carriage bolt.
Here's the process:
Mark the center of the leg bottom:

Bore a slightly undersized hole:

I usually bore the hole to match the length of the connector nut, but I didn't have my Stanley 47 with me, so I used the much less accurate "tape system".
Then I used my favorite technique for removing chips from the bottom of the hole - just pass the straw between the fingers of your cupped hand and blow hard - no dust in face, eyes or hair:

Tap the connector nut into the hole with a hammer:

After starting it with the hammer, I switch to a heavy rubber mallet and a piece of scrap wood to drive it home:

If you drive the nut completely with the hammer, the threads can become distorted from the pounding and the bolt won't adjust smoothly. DAMHIKT.
And here's the bolt:

The hockey puck foot ready for boring:

Don't squeeze it too tight, or your hole becomes extremely oval when the puck is released from the vise.
Here's the finished foot:

This one is actually wrong - I forgot we reset the adjustable auger bit for a student's project, so the hole is too big. One important note: the hole needs to be deep enough to fully seat the carriage bolt head, but not so deep that the square shank is recessed as well.
And the finished bench leveler foot:

The foot is very simple to adjust - just slip an open-ended wrench over the square shank and turn. These new feet have made workbench leveling at our school shop about as easy as it can get. I think I might have to retro fit my own bench at home...
Saturday, February 18, 2012
Shop Art : The Stanley Tool Guide
Well, lately I haven't been putting in much time working on (or in) my shop at home. Rather, it's been a long push to get the school shop up to speed. I'm happy to say it is now very close to being finished. I'll post some pictures soon in case anyone is interested.
There was just one problem. I had one wall that was way too blank. It needed something, but I just couldn't decide what it was. Then I found the perfect shop art to hang - "The Stanley Tool Guide". It's from the early 40's and is both practical and decorative. Well, decorative if you are a crazy, hand tool fanatic I guess.
I took it apart and framed the pages. Here are some shots - not the best quality unfortunately, but I think they show what I like about the prints.
The whole wall - and yes, it's pink. Got a problem with that?

And some detail shots:


Tuesday, January 31, 2012
Huberd's Shoe Grease
I love to read WoodenBoat, "the magazine for wooden boat owners, builders and designers", although they really should add "dreamers" to that list - and I doubt it's just me. It is, in my humble opinion, the best magazine out there - especially since the demise of Woodwork. Anyway, I was looking through an old issue from 1999 and stumbled across an article/review of Huberd's Shoe Grease, which I had never even heard of. The author, Greg Rössel, stated that he tried the beeswax and pine tar product on leather with good results, and that it also had some promise on wood. Included with the article was a picture of the can - it looked awesome and I decided to try to find some.
So, I asked Mr. Google and located their site (http://www.huberds.com/) and some online retailers, but never got around to ordering any. Then, not too long ago, I was walking through the outdoor/camping section of my local "Big Box Costco Reseller" and there looking about 100 years out of place was a can of Huberd's Shoe Grease. The can was even cooler in person, but what really sealed the deal was when I popped the lid and took a big whiff of the grease. Mmmm. Deep memories stirred - I knew that smell, and it wasn't just the beeswax. Pine tar? I still haven't figured out where I know it from - previous life maybe?
I bought it:

I've played around with it a little and it is definitely interesting. I don't know if it will end up being a regular finish in my shop or not. I'll keep you posted.
Sunday, December 4, 2011
Gratitude
For a long while now, I’ve been thinking about all the people, and things, that have helped me on this hand tool woodworking journey I’m taking. What better time to express my thanks than Thanksgiving (or a week or two after Thanksgiving…). So here goes (and please forgive me, but there is no way I can cover it all – this is just the tip of the very large, and growing, iceberg).
My Father
When I was a kid, Dad followed his dream and opened “Jim Klauder & Son’s Country Hardware” and I used to “work” there all the time. I think he told me that he was the President and I was the Treasurer or maybe it was the Secretary. Whatever it was, I was in. I know my love of tools was fostered in that store. Dad also bought a load of old woodworking tools when we were at a Bus Mars* auction up in Vermont. He used them to decorate the walls of the store. Most of those tools were sold when we closed the store after Dad died, but I do have a few out in my shop. Thank You Dad.
*You can count yourself truly blessed if you ever got to see, and hear, Bus Mars in person – he was the best auctioneer that ever lived. The story goes that one time his helpers replaced the next item up for bid with some rocks from the ground outside – just to try to throw the old man off. Without missing a beat, Bus sold them for $20. That’s the story. I saw him. I believe it. Thanks for that too, Dad.
My Brother Jim
Jim is a great carpenter, and I learned a ton by working with him off and on over the years. He taught me: details matter, work hard and be honest, there are no mistakes that can’t be fixed (and you have to fix them), respect your tools, and always clean up when you are done working for the day. Thank You Jim.
My Brother Josh
Josh is responsible for me moving to Alaska, and he promptly put a drawknife in my hand, with which I promptly cut myself. Sometimes that’s how you learn; I’ve never done it since. Josh is also a firm believer and practitioner of the “follow your dream” philosophy, and always comes through with geek support when I need it. Thank You Josh.
Roy Underhill

In October of 2003 I got to spend two days listening to Roy talk about woodworking (and everything else – the guy is amazing). I had recently finished filling my garage shop with all the power tools I could find: band saw, table saw, drill press, router table, jointer, planer, oscillating spindle sander, etc. I did have some hand tools – mostly a couple of planes (see below), but I was at least 80% power oriented. As I sat in that room, and listened to Roy’s philosophy about working with only human powered hand tools, it just resonated with me. It was like waking up from a deep sleep – and asking “What am I doing? And why?” Less than one year later, all the power tools were gone from my shop and I was loving it! So, for teaching me to “Just say no to power tools!”, for your wonderful “Woodwright’s Shop” television program, your fabulous books and for setting me on the road less traveled – Thank You Roy.
Wayne Miller & Badger Pond
I came late to The Pond, only about a year before it shut down, but I spent a lot, a lot, of time lurking there. I don’t think I ever posted (partly too shy, mostly too ignorant) but I swam daily in the shared knowledge of others on the boards. At first it was power tool stuff, but I wandered into Neanderthal territory too. I learned how to fettle a plane there, and thanks to Scary Sharp posts, I learned how to sharpen. One of the things I appreciated most was the safe, positive atmosphere Wayne maintained (“Benevolent Dictator” indeed) at The Pond. For a short while, at a critical time on my woodworking journey, Badger Pond was my main source of learning. Thank You Wayne, and all the Ponders.
Kari Hultman - The Village Carpenter
Kari’s blog was, and is, inspirational. She was always positive and supportive, and that meant a lot to me when I was just getting this blog up and running. Perhaps you’ve noticed that The Village Carpenter link on my blog roll is out of alphabetical order – there’s a reason for that – just a tiny tip of the hat. Thank You Kari.
Bob and Dave Key
Back when I was setting up shop, I knew I needed a workbench, but didn’t know how to go about it. I started reading, in books and on web, and started planning and dreaming and my bench ideas got bigger and bigger, and more and more complex and more and more intimidating. I was just about overwhelmed, when I discovered “Bob and Dave’s Good, Fast and Cheap Bench” web page. What a revelation. I read it and I did it, and although it is far from perfect, I’m still using it and it makes me happy every day. Unfortunately, the full site is gone, but if you do a bit of searching on Google, you can find a link to the bench article that has been preserved (as it should be). For helping me cut through the bewildering amount of information and follow the “keep it simple” path to a perfectly fine workbench – Thank You Bob and Dave.
This Plane

The first plane that I owned that worked. There aren’t a lot of sources up here in Alaska. I was reading about planes on Badger Pond and knew I wanted to use them. I tried Sears – fail! What a hunk of junk that plane was – took it back the next day. I finally found this baby at a “perma-yardsale” site out on the highway. To quote the Boss, “You ain't a beauty, but hey you're alright ...” and it worked; shavings! Oh the joy! More! More! Thank You “Westlake, by Stanley” jack plane.
Celena
And finally, to the person I am most thankful for, my unbelievably wonderful wife, Celena. She is incredibly patient and supportive – from waiting while I run into countless junk/antique stores because “they look like they might have old tools”, to “I’ll be in just as soon as I finish this next part.”, to waiting months and months (years?) for me to finish projects I promised in weeks (the bed, the floor, the deck, the roof, the kitchen, the wood stove fence and many, many more). For this and so much more – Thank You Celena.

Sunday, October 16, 2011
Sharpening Shelf
Last February I posted about the movable Scary Sharp station I made for our school shop. Well, I just converted it into a permanent station:

It was just getting in the way and I had the brackets left over from an ill-fated home project. I might add a second layer with pockets for extra tiles/paper.
It did occur to me that if it had a tight fitting lid that would also contain the front edges of the tiles, I could mount it on hinges and let it hang flat on the wall. Then, when needed, it could swing up, folding brackets would swing out to support it, and the lid would lift up and hook to the wall. Cool. But rather a lot of work to gain a little space - maybe later...
PS - No, that corner of the shop is not really that neat and empty - I just moved everything out of the way to work on the shelf. We moved the woodshop down to the ground floor, which is great, but the room is a little smaller and I'm working hard to get everything to fit.
Monday, October 10, 2011
Saturday, October 8, 2011
Rust Never Sleeps - Electrolysis Revisited
So the other day while driving into work on my day off - (yeah, I know...) I stopped at a garage sale. Hiding under piles and piles of useless stuff I found two block planes! I quickly snapped them up for our school shop. Oh, and to show you how bad the rest of the sale was, it was "buy two get one free" and I couldn't find a single other item worth it. Sheesh.
Anyway, one plane was a cheap Stanley 110 in decent shape. The other was a rather nice Craftsman model (made by Stanley) but almost totally encrusted with rust. The only hint that it had an adjustable mouth was the adjustment lever. You sure couldn't tell from looking at the sole.
Time for Electrolysis!
You can read my previous post about electrolysis to see my set-up etc. And as always, be careful!
Into the tub - Zap! Wipe it off and back in - Zap-O! Wipe it off again. "Hey! It really does have an adjustable mouth! But still rusted tight. Once more into the tub - Zap-a-reeno! Wipe off and, well I think I'll let the photos speak for themselves.


If it hadn't been getting dark (I do all my electrolysis outside) I'd have done one more long zap to get every last little bit of rust off. But hey, it's a user after all...
Subscribe to:
Posts (Atom)